How to experience CP/M-80 2.2 using MAME's NCR Decision Mate V emulation?

In the last tutorial, we saw how to experience CP/M-80 2.2 using MAME's Sharp X1 emulation. There are three system on which we can run CP/M-80 2.2:
- KAYPRO II
- NCR Decision Mate V
- Sharp X1
In this tutorial, we are going to use the NCR Decision Mate V emulation. You can download the files required for this tutorial from here:
- CP/M-80 2.2 for NCR Decision Mate V disk image files
- MAME NCR Decision Mate V ROM
- MAME NCR Decision Mate V keyboard ROM
- MAME NCR Decision Mate V upd7220 ROM
- MAME NCR Decision Mate V dmv_k230 ROM
- mame.ini file for Linux
- mame.ini file for Windows
Installing CP/M-80 2.2
First you need to make sure you have installed MAME. For windows, see our tutorial on Legacy Installer on how to install MAME on Windows. For linux, you can install mame from the official repository of your distribution. See this page for a list of distributions offering the package. If your distribution does not include mame in its repositories (highly unlikely), you can build MAME from source.
After you have installed MAME, you need to create a folder in which all the files related to the emulator will reside. Open a Terminal/Command Prompt window and move to that folder. Then run:
mame -cc
You may need to specify the path to MAME if you are on Windows:
"C:\Program Files\MAME\mame.exe" -cc
This command will create some basic config files for MAME in that folder. Now open the folder in your File Manager and delete the mame.ini file. Extract the mame.ini file from the archive you downloaded above according to your platform and copy it to the folder in which you are storing all the files related to the emulator. Create a folder called roms in that folder. Copy all the ROMs archives to that folder. Do not extract the ROMs from the zip files. Move the zip files without extracting to the roms folder.
Extract the disk image archive and copy the Cpm80dmv.imd file and the extras folder to the folder where you are storing all the files related to the emulator.
Now switch back to the terminal and run:
mame dmv
You need to prefix mame with the path on Windows as shown above. The mame window should open like this:
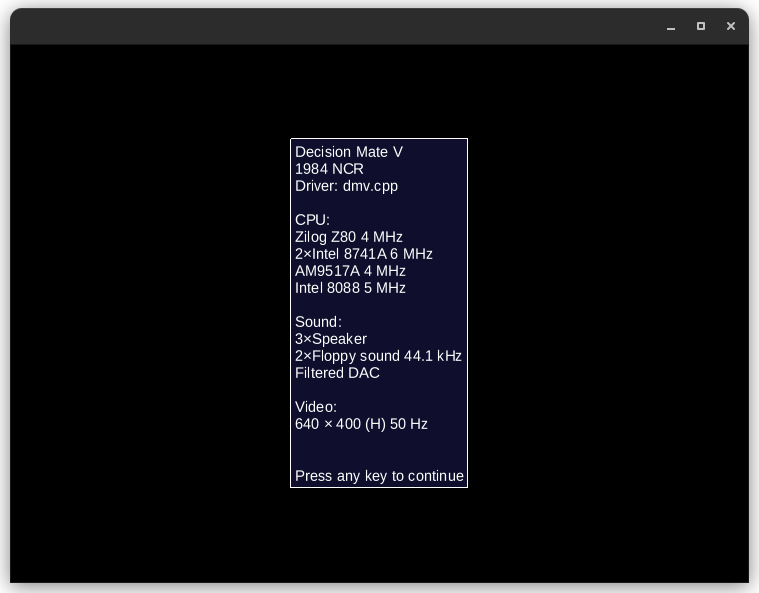
If the window does not open and you get a ROM not found or similar error, see the troubleshooting section below. Press any key to continue.

Press the CAPS LOCK key to enable UI control. Then press the TAB key to open the menu.
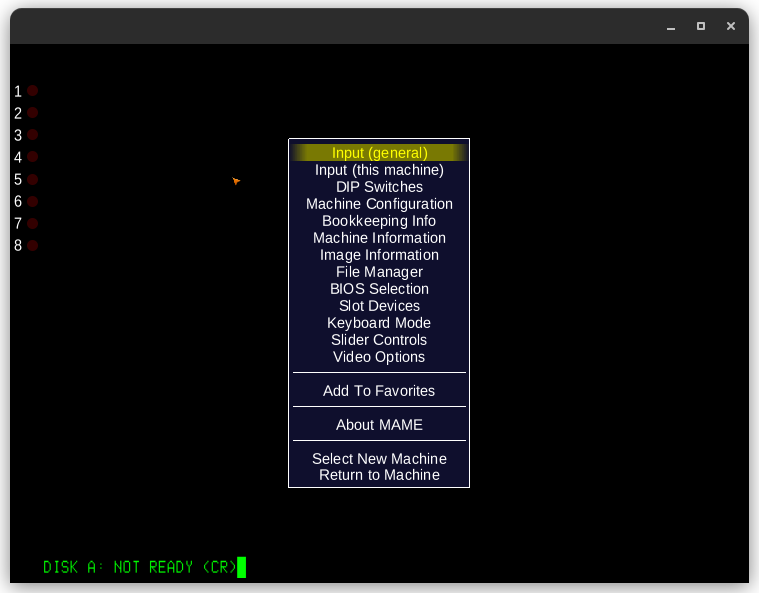
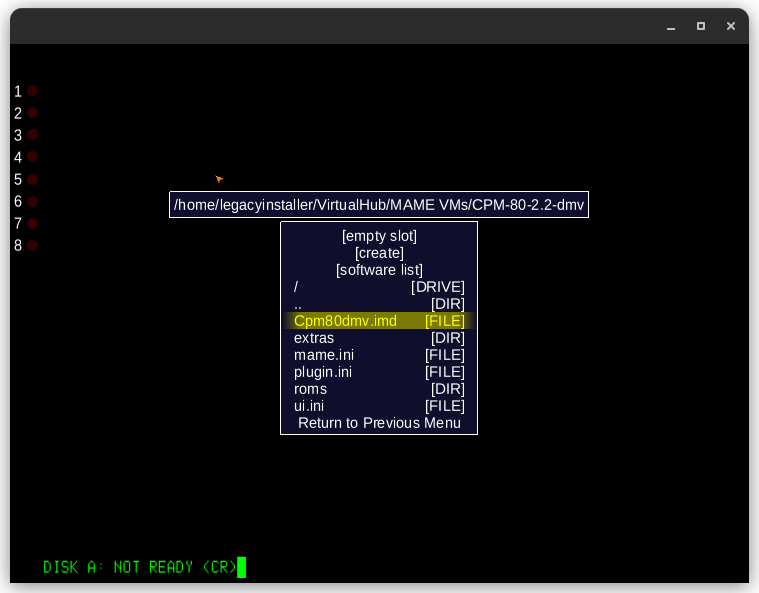
Then click on File Manager > floppydisk1. Choose the KAY64CPM.IMD file from the list and choose Read-write.
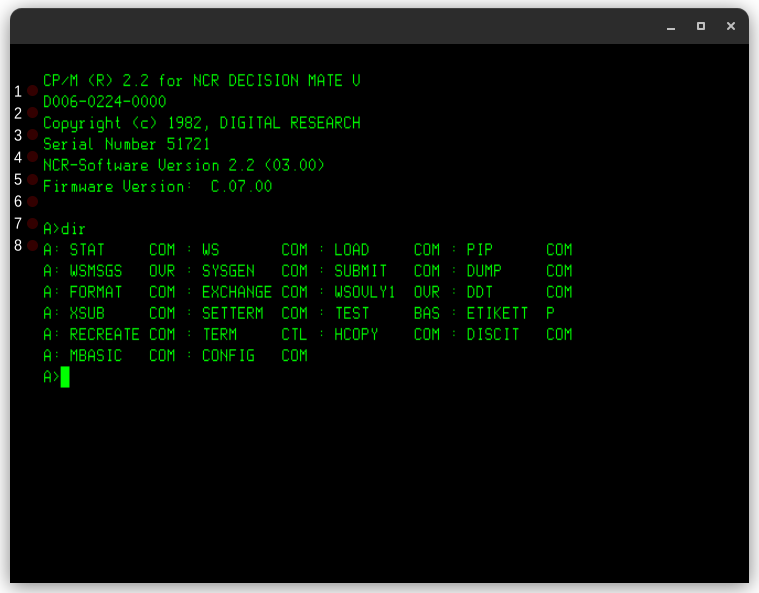
Then click on Return to Previous menu > Return to the machine. Press the CAPS LOCK key once again to turn off UI control. Press enter a few times to start CP/M-80 2.2. You can enter the DIR command to see a list of files.
Now, you can close this window. The next time you open the emulator again, you don't need to go through all these steps. Just open your terminal and navigate to the folder where all the the files related to the emulator are stored and run:
mame dmv
You need to prefix the above command with the path to MAME on windows as shown above.
But this method is very troublesome and lengthy. We can make a shell script which runs the above command on linux:
#!/bin/bash
mame dmv
and save the file as CPM-80-dmv.sh. Then make the script executable by running the following command in terminal after navigating to that folder:
sudo chmod +x ./CPM-80-dmv.sh
Then we can right click on that file and click on Run as Program to open the emulator. Some DEs and distros may have other methods of running shell scripts.
On Windows, it is much easier. Create a file called CPM-80-dmv.bat in that folder with the following contents:
"C:\Program Files\MAME\mame.exe" dmv
Then double click on that file to launch the emulator.
That's it. We have installed and run CP/M-80 2.2 using the MAME's NCR Decision Mate V emulation. There are disk images for some software in the extra folder. We will cover these software later.
Troubleshooting
First make sure that you have placed the roms files in the correct place. Do not extract the files. Place the zip files directly in the roms folder.
On Linux, there might be another error. MAME might have been configured to look in your ~/.mame folder for its config files. If that is the case, running the command mame without any parameters in the folder where you have stored the files would result in MAME opening in full screen instead of a window. If you are affected by this problem, here is the solution:
- Configure your file manager to show hidden files.
- Go to the
~/.mamefolder. - Delete the
mame.inifile there. - Copy the
mame.inifile you downloaded from above to that folder.
The mame.ini file you downloaded above instructs MAME to look for another mame.ini file in the current folder and use it if found. So, you can then follow the tutorial and everything will work.
Some explanation
I asked you to replace the mame.ini file with the one you downloaded from here. What are the differences between those files? Here are they:
- It instructs MAME to open in windowed mode instead of full screen.
- It modifies the key needed for enabling UI controls from Scroll Lock to Caps Lock. This is done because many keyboards do not have a Scroll Lock key.
- On Linux, it instructs MAME to first look for configuration files in the current directory, and if found, use them instead of the one from
~/.mamefolder.
That is it.
Manuals
- CP/M 2.0 Interface Guide
- CP/M 2.0 System Alteration Guide
- CP/M 2.0 User's Guide for CP/M 1.4 Users
- CP/M User Manual
- CP/M 2.2 MANUAL
- CP/M Reference Manual
Some Software
Related Pages
- WinWorld Page
- Wikipedia
- The Unofficial CP/M Web site
- Gaby's Homepage for CP/M and Computer History
- Commercial CP/M Software (Retro Archive)
- A lots of other links
Credits
- The MAME emulator is an open source project hosted on github developed by MAMEDev and contributors.
- The disk image used above was taken from WinWorld.
Comments